Windows install - Disk Clean by John Crawshaw

Here is a quick tutorial to make sure you have a clean install of windows. Many hardware manufaturers create small partitions for recovery which arn't needed. Also some new disks are in the wrong format for windows to be intalled. The few steps below work every time for clean install. 

1. Boot from windows disk (your boot menu will be something like F11 or delete. A message on screen will let you know.)

2. Follow the windows instructions until you get to this screen:

3. Press Shift+F10 and type the following instructions:

4. Close the window and continue installing windows. 

Hope this helps. I know it's helped me out over the last year or so. 

Physical Camera Exposure maxscript by John Crawshaw

I was really struggling to get this working as the documentation isn't great in this area. The new physical camera in 3Dsmax 2017 doesn't turn on the exposure automatically. 

SceneExposureControl.exposureControl = Physical_Camera_Exposure_Control() SceneExposureControl.exposureControl.active = true

http://www.gritengine.com/maxscript_html/automatic_exposure_control_superclass_maxobject_2.htm

Phoenix ocean test by John Crawshaw

Having looked at Houdini for some ridged body things. I started looking at some water simulation tutorials online. While on my search I stumbled across a tutorial for Phoenix boat simulation. I'm quite happy for a first pass. But I would like to work on the look of the water and the shaders on the boat. Here you are go:

Houdini rigid body test/Ocean by John Crawshaw

For a long time I've had, look at Houdini on the list. I thought I would start simple with a quick rigid body test and a ocean test for an upcoming project at the neighbourhood. Hopefully more to come over the next few weeks. 


Dotnet Maxscript form by John Crawshaw

Here is a short and sweet blog post on how to create a dotnet form in 3Dsmax. There are a few out there, but I thought It would be good to share the one I use on a daily basis. The best feature of this is the fact that you can drag the UI around. This basically allows it to run like a normal windows UI but with all the nice UI features of dotnet. In the video I have shown how you can quickly adjust the height and width of the UI, and the close button will always align to the top right. 

Here is the code below. Hope it helps you out! I'm going to try and add some standard buttons and dropdown as examples over the coming weeks. Almost like a tool kit of how to get started with dotnet. As always any questions just leave a comment below and I will attempt to answer it the best I can.

John

try(dn_form_Tasks.close())catch()
    
Ccolor = dotnetclass "system.drawing.color" 
Padding = 6
HexFont = dotNetObject "System.Drawing.Font" "Verdana" 10 ((dotNetClass "System.Drawing.FontStyle").bold)
fnt_Titles = dotNetObject "System.Drawing.Font" "Myriad Pro Regular" 8 ((dotNetClass "System.Drawing.FontStyle").regular)

--Dotnet Colours
global TopbarGrey = (dotNetClass "system.drawing.color").fromArgb 73 73 73
BackGrey = (dotNetClass "system.drawing.color").fromArgb 29 29 29

--Form Settings
dn_form_Tasks = dotNetObject "MaxCustomControls.MaxForm"
fn changeBackcolor = (dn_form_Tasks.backColor = BackGrey)
dotnet.AddEventHandler dn_form_Tasks "BackColorChanged" changeBackcolor
dn_form_Tasks.AllowTransparency=true
dn_form_Tasks.opacity=1
dn_form_Tasks.width=600
dn_form_Tasks.height=200
dn_form_Tasks.FormBorderStyle=(dotNetClass "System.Windows.Forms.FormBorderStyle").none  

--'Close' Button
dn_btn_Close = dotnetObject "system.windows.forms.button"
dn_btn_Close.width=35
dn_btn_Close.height=34
dn_btn_Close.top=0  
dn_btn_Close.left=(dn_form_Tasks.width-35)
dn_btn_Close.flatStyle=(dotNetClass "System.Windows.Forms.FlatStyle").flat
dn_btn_Close.backcolor = Ccolor.lightgray
dn_btn_Close.forecolor = Ccolor.dimgray
dn_btn_Close.font = HexFont
dn_btn_Close.text = "x"
dn_btn_Close.flatappearance.bordersize = 0
dn_form_Tasks.controls.add dn_btn_Close

fn md_btn_Close dn_btn_Close evnt =
(
    dn_form_Tasks.dispose()
)
dotnet.addEventHandler dn_btn_Close "MouseUp" md_btn_Close

--Asset ID Label
lbl_AssetID = dotNetObject "label"
lbl_AssetID.text = "Create Project - Main two"
lbl_AssetID.backColor = TopbarGrey
lbl_AssetID.Width = dn_form_Tasks.width
lbl_AssetID.Height = 23
lbl_AssetID.left = 5
lbl_AssetID.top = 11
lbl_AssetID.forecolor = Ccolor.darkgray
dn_form_Tasks.controls.add lbl_AssetID

--Shotgun Image
TopBar = dotnetobject "Windows.Forms.PictureBox"
TopBar.backcolor = TopbarGrey
TopBar.width = dn_form_Tasks.width
TopBar.height = 35
TopBar.left = 0
dn_form_Tasks.controls.add TopBar

global mouseOffset = [0,0]
global dragging = 0

fn lbl_AssetIDDown lbl_AssetID evnt =
(
    mouseOffset[1] = mouse.screenPos.x - dn_form_Tasks.left
    mouseOffset[2] = mouse.screenPos.y - dn_form_Tasks.top
    global dragging=1
)
dotnet.addEventHandler lbl_AssetID "MouseDown" lbl_AssetIDDown

fn lbl_AssetIDMove lbl_AssetID evnt =
(
    if dragging==1 then
    (
    local FormPos = #()
    local NewPos = #()  
    FormPos[1] = dn_form_Tasks.left
    FormPos[2] = dn_form_Tasks.top
        
    NewPos[1] = mouse.screenpos.x - mouseOffset[1]
    NewPos[2] = mouse.screenpos.y - mouseOffset[2]
    
    dn_form_Tasks.left = NewPos[1]
    dn_form_Tasks.top = NewPos[2]
    )
)
dotnet.addEventHandler lbl_AssetID "MouseMove" lbl_AssetIDMove

fn lbl_AssetIDUp lbl_AssetID evnt =
(
    global dragging=0
)
dotnet.addEventHandler lbl_AssetID "MouseUp" lbl_AssetIDUp


--UI FINISH


--Declare and create form
dotNet.setLifeTimeControl dn_form_Tasks #dotNet
dn_form_Tasks.showModeless()
fn getScreenResolution=
(
    screen = (dotNetClass "System.Windows.Forms.Screen").PrimaryScreen.Bounds
    return #(screen.Width, screen.Height)
)
res = getScreenResolution()
ResWidth = (res[1]/2)-(dn_form_Tasks.width/2)
ResHeight = (res[2]/2)-(dn_form_Tasks.height/2)
dn_form_Tasks.top = ResHeight
dn_form_Tasks.left = ResWidth

Shotgun asset library - 3Dsmax by John Crawshaw

Hi All,

I thought I would write an item on the latest pipeline tool I have been working on at the neighbourhood. For as long as I have been in 3D I have had problems finding assets in the asset library on the network hard drives. This isn't down to the companies I've worked for or the people I've worked with. It's just that the search in windows isn't that great, and the information you might want to search for isn't relevant. For example, when was that last time you searched for an asset created on May 2011 with a file size between 1.2mb and 1.8mb?

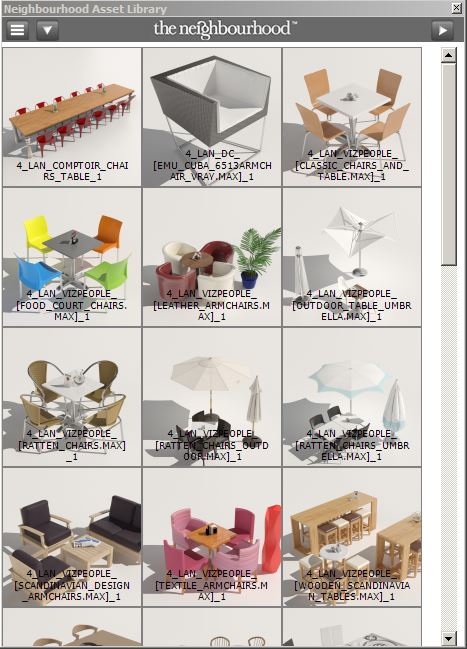
What we required was an asset library which could be browsed in 3Dsmax and import the models into a scene with a click of a button. With this in mind, my self and colleague Alex Farrell started work on Asset Library 1.0. Built in dotnet/maxscript it was one of the main challenges for me. It worked for the most part. Working from a set folder structure on the network drive. I simply looked for a max file and then a jpg called the same with a .jpg extension. Although massively improving on what we had before. It still lacked the ease of being able to search for an asset by tags or category. 

Featured below: Asset Library 1.0

A year on from Asset library 1.0. we started to think about Asset Library 2.0. This would have to be searchable and have a tagging system. After looking at a few examples it became apparent that it would be extremely difficult in dot net. At the time I was looking at shotgun for the studio pipeline. I conceived that it would be better to set up a project that could mirror the central asset library on the server.

When I was writing my own tool it required an interface that could connect to the shotgun API. This was made very easy by duber python. A set of scripts that talks to shotguns API and passed the information back to maxscipt via ironpython. It may sound complicated, but once Lukas at duber studios had set it up for me it was quite simple. He also made a self contained folder that could be copied around the artists workstations. 

Finally, I was at a point where I could start writing the tools. The tools would come in two parts. The first part would be getting the assets into the library and the second part would be getting them out. For the first tool Shotgun needed some new fields adding to support the tool. The main new field was MAXPATH. This was a string that stored the path to the local server. Once I had created this and a few other custom fields I was ready to move on to the second part. 

Part 2 was now simple. Each asset, shot or task has an ID on shotgun. This was such a useful feature as all that was required was the artist to know a short code to enter into a dialog box. This could be found below each thumbnail in the shotgun library. The script then looks on shotgun for that ID and finds the corresponding MAXPATH. From there a simple merge scene command is executed with MAXPATH as the string and the asset is in the scene. See video below.

I hope this has been an interesting read. Thank you to the neighbourhood for having the vision to allow myself and Alex to write this tool. I feel we have put down some great foundations for the coming years, as we expand the library and add new features. Feel free to leave any comment below or contact me if you have any more in depth questions. 

John.

FMX: 2015 by John Crawshaw

Where do I start. What a fantastic few days in Stuttgart at FMX:2015. This was my first experience & here are the top highlights were:

The Visual Effects of Interstellar - Paul Franklin
This was my last talk of the FMX. But it didn't disappoint. Award winning Paul Franklin had cues around the building to see his presentation. I was shocked to see how much of the film was real or real miniatures. Their commitment to get dynamic shots was stunning. The week in Iceland that was spent to film the wave scene from the movie. It really showed how film footage can provide the most real results.

Houdini to Arnold in The Mill's LEGOLAND - Adam Droy (The Mill)
I was slightly unsure about this presentation as I was concerned how much Arnold would be relevant to me been a Vray guy. It turned out to be a hit and defiantly a piece of software I'm going to try and download a trial of and try out. It was great to briefly talk to Adam afterwards, and pick his brains on HDRI's and general production questions.

The Hobbit & 20 Years of Weta Digital - Joe Letteri (Weta Digital)
It was simply amazing to see how these major production were crafted. In most cases the shear volume of work was stunning. The work done by Weta on the Hobbit, just showed the lengths they had to goto and how hard everyone had worked over the last 20 years. 

Walt Disney Animation Studios: The Pipeline Challenges of Big Hero 6 - Dr. Hank Driskill (WDAS)
The Walt Disney Animation presentation was and eye opener. No versions! No Filename changes! No pipeline changes. Something I'm going to try on a smaller scale. Also the 80/20 rule. An asset is only ever completed to 80% as they know they will have changes on that asset. And if not they save valuable production time.

As you can imagine, I could go on and on. I hope I've given you a little insight into the highlights of FMX. I would thoroughly recommend it to anyone in the CG field. Truly an eye opener.